Search

Showing posts with label Lola. Show all posts

Crazy Hair Day


Today is crazy hair day at preschool. 
I started out with no plan, and this sort of just evolved.
A lot of people said it looks pretty Dr. Seuss, which I suppose it does. :)


What a fun day!

Pumpkin Picking


We made the hour and a half trek to go pumpkin picking
 at Covered Bridge Ranch, yes that is the nearest place to pick pumpkins.

It was a wonderful day complete with a hayride, hot cider, and eating 
sunflower seeds right from the flower! 


Lola loved the seeds so much that after leaving the farm we headed 
straight to the natural market to buy her a big bag. 


Christmas Part Two


She absolutely LOVES this dog.
I think she thinks it's real, she was giving out treats to Jet and brought one over
to this guy and put it in his mouth. Seriously, too stickin' adorable!


Christmas Part One


This is from Christmas Eve, Santa was VERY good to Lola!
You can't see in this picture, but presents continued to the left, and behind where I was standing taking the picture too. And to think that Santa agreed to take it easy.


Phew, all these gifts are exhausting!
Time for a rest with Daddy.

Christmas Part Two tomorrow.


Happy New Year


Happy New Year!

Wishing you all a safe and happy New Year.
I wish for each of you that the year to come is filled with peace, love,
kindness, smiles, creativity, health, and laughter.

As a side note, I have not neglected posting about our amazing Christmas Day, I have been quite busy this past week, and promise to post about our Christmas and all the incredibly amazing and thoughtful gifts Lola received this coming week.

Then, hopefully the following week, I will finally get to post her Birthday Party which was back in October. I have a bunch of fantastic tutorials, recipes, and party ideas for you.


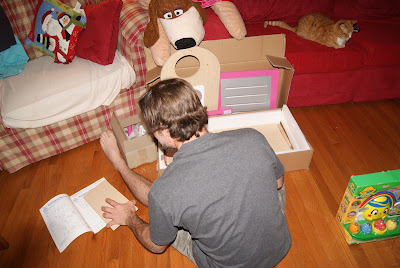
Santa's Workshop

 Jeff was so excited to have his first late Christmas Eve night toy assembling project.


 Uncle Jim was a big help!

 Uncle Beezer, not so much.


The guys got it done in plenty of time, and it looks fantastic!
She is going to be so surprised!

See the finished project here.


Snowflake Tutorial


I mentioned in an earlier post that we are creating our own white Christmas
this year, and that is no joke. Jeff and I (mostly Jeff because he is amazing) made dozens
of paper snowflakes in a variety of sizes, dusted them with fine glitter (fairy dust I think 
it was called), and will hang them in the windows with fishing line on Christmas Eve
to make it look like it's snowing when Lola wakes up on Christmas Day.
Pictures of the windows here.

Below I have demonstrated how to fold the paper, and cut the snowflakes.

 Start with a square.

Fold in half to make a triangle.

Fold in half again to make smaller triangle.

From the pointed side, fold into thirds.
 This is the hardest part.

After both sides are folded this is what it will look like.

 If you were to open up the last two folds, 
this is where the creases are.

 Cut off the bits that hang over.

 You will be left with a triangle.

Now for the fun and creative part, cut your design.
Cut away more paper than you think that you should, the negative space
is what gives snowflakes their delicate lace-like design
making sure that you leave
bits of the edges so that it holds together.

See how I cut most of the paper away?


Unfold, and be amazed by your genius!

For those of you who are nervous about jumping right in and free-handing
your own flakes, I posted a few of the flakes that we made below so that you can get an idea of what to cut away to get different the patterns.

.


Tips to remember when making your own flakes:
Snowflakes are all different, so don't worry about making them the same. Besides I think
a grouping looks best when there is a variety of sizes, shapes, and styles.
Use very sharp small scissors.