Search

Showing posts with label Green. Show all posts

Sweater Pants

 
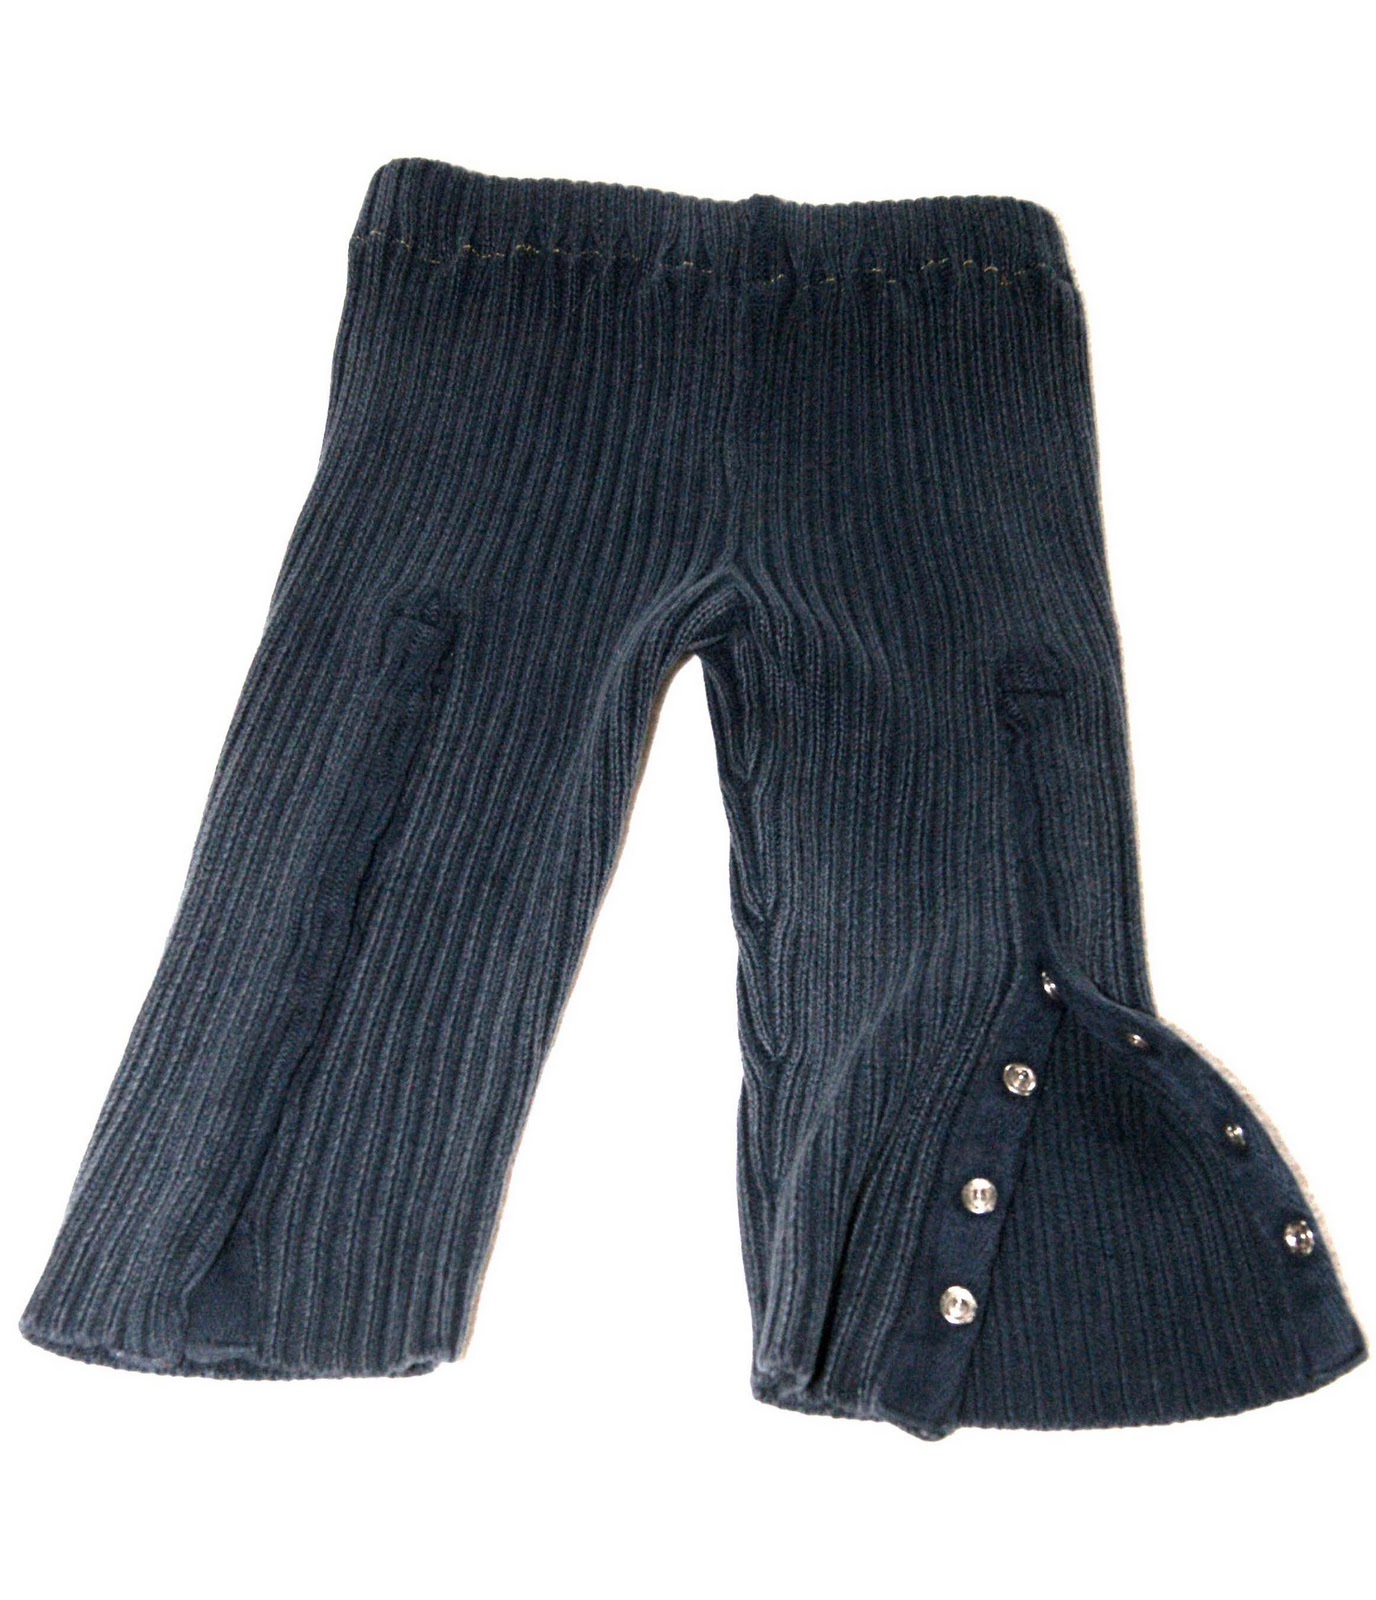
This past weekend Lola and I went to visit Damaris, as always it was an absolutely fun time and was productive and creative to boot! We made Lola these pants from and old sweater that Damaris had set aside to send to the thrift store. 

I had forgotten my camera, so we were unable to do a step-by-step to show you how to make them, this time. But, as I was telling my friend Erin about them we decided that her little boy Ian, who is due in January must have a pair as well! So, I will document the "how to" then!

 The sweater we chose for Lola's pants was incredibly soft and had an interesting snap detail on the sleeves that we used on the back of the pant legs! They were so easy to make, and I love them so much that Lola may be spending her entire winter in warm fuzzy sweater pants!


Front

Back


Back

Lola is so cuddly in these pants, and they are so comfy for her that she is able to play, stretch, and climb in them with no problem. Truth, I wish I had some sweater pants for myself!


I can't wait to get started on Ian's!!! 
My goal is to have the "how to" posted next week.


So Cool, It's Nuts


I came across this incredibly quick and simple DIY (I apologize I can not find the original source), and wanted to share it with you! I love that it could absolutely be dressed up or down!

If you are looking for me, I will be rummaging through Jeff's toolbox looking
for rope and unused hardware to re-purpose.

Josh Finkle


 These gorgeous handcrafted wooden toys designed by Josh Finkle are extinct
animals that he says are "meant to incite wonder and interest in creatures that existed
only a short while ago." I think that these figures are brilliant, artfully crafted, and exactly
the sort of toy that I want Lola to have when she is growing up.
 

Left to Right: Steller's Sea Cow, Tasmanian Tiger, Quagga, Pig Footed Bandicoot,


Packaging unfolds to explain extinction of animal.


 All photos are from jfinkle.com


One Percent is 100% for the Planet


 One of the things that I am very excited to do on Simply Living is to feature
lesser known companies, non-profits, and foundations that are doing business
in a sustainable, green, humanitarian, or otherwise earth friendly
or compassionate manner. 

One Percent for the Planet is such an organization,
and the perfect choice as the first Green feature on Simply Living.

Below is a fantastic short film about 1% for the Planet, their beginnings, their
mission, and a few of their very first members including Patagonia, and Jack Johnson.


 They have challenged business to donate 1% of sales (not profits, SALES)
to environmental groups. Since 2002, 1,476 companies (see list here) have accepted
this philanthropic responsibility, and are donating to 2,591 environmental
organizations (see list here) across the globe. 

Please check out their website or blog to learn more.

Sew Beautiful


I have been working on a new sewing pattern (I will show you as soon as it's
ready
), and as I worked  and reworked the pattern, my poor finger tip was getting numb
from all the pinning and re-pinning of the material. Frustrated and sore, I decided to switch creative gears, rummaged through my box of things that I saved to use for something someday, and grabbed a piece of costume jewelry. I cut the glass beads from the string,
and re-purposed them as tops for beautiful new straight pins.

 The larger flat top of the decorative pins are the perfect solution to sore finger tips.
I'm pretty pleased with the results!
What do you think?

Iron Out a Space Wrinkle


If you are one of the lucky ones, you have a huge crafting & sewing room
where you can spread out and let the creativity flow. Then when you are finished
for the day, close the door behind you, mid project everything still in place...including
your ironing board. If however, you are like me your space needs to do double maybe
even triple duty. Currently my space dedicated to creating is the same VERY small space
that Jeff uses to tie his flies (he is a huge fly fisherman). This means that when I
want to sew I first swap out all the fly tying supplies for my sewing stuff. Obviously
space is an issue for us, so a full ironing board is out of the question.

This green DIY is the perfect solution for me.

Even if you are one of those lucky ones that I mentioned before, this mini folding
ironing board made from an old pillow case, and a TV tray (I re-purposed a pillow case
that out lived it's sheets, and a TV tray that had belonged to my grandmother and never
gets used anymore) will benefit you too because the height of the TV tray allows you to
press seams and smaller pieces of material without having to keep standing up (or in
my case standing up and walking down the hall to where the ironing board
is taking up the living room).


You Will Need:

Scissors
Staple Gun
Medium Weight Batting
Old Pillow Case
Folding TV Tray


How To Simply Create
  1. cut out 2 or 3 pieces of batting approximately 2" larger than your tray on all four sides (if you are using light weight batting cut out about 7 pieces)
  2. cut your pillow case along the seams
  3. using a piece of batting as a template cut the pillow case
  4. center batting on TV tray and turn tray upside down so the batting is sandwiched between the tray and the floor
  5. starting in the center, staple batting to the under side (the side facing up) of the tray stopping about an inch from the corners
  6. on opposite side smooth and pull batting so it is taught then starting in the center staple batting to tray pulling batting taught as you go along stopping about an inch from the corners
  7. turn table right side up and smooth material 
  8. turn upside down 
  9. repeat steps 5 & 6 on remaining two sides
  10. trim bulk off corners (leave enough to staple) and carefully pull extremely taught and staple so there are no wrinkles on the sides at the corner of the table (this will require a lot of staples)
  11. repeat step 10 on all remaining corners
  12. trim batting leaving about a .25" 
  13. turn table right side up and center material from your pillow case
  14. turn back upside down
  15. fold material about a half inch and then again over on itself and then again
  16. starting in the center, staple material to table making sure to cover all raw edges of the batting stopping about an inch from the corner
  17. just as you did with the batting, pull the material taught on the opposite side
  18. repeat step 15
  19. smooth and pull material taught then starting in the center staple material to tray pulling material taught and making sure to cover all raw edges of the batting as you work toward the corner. stop about an inch from the corners
  20. turn table right side up and smooth material in all directions so there are no wrinkles
  21. turn back upside down
  22.  repeat steps 15 - 19 for remaining two sides
  23. trim material at corners
  24. pull material taught making sure there are no wrinkles on the edge of table then fold material at the corner under itself and staple securing the material to the table
  25. repeat step 24 for remaining three corners 
  26. turn table right side up, step back, and marvel at your amazing-ness :O)
Approximate Time to Complete: 1 hour


Going Soap Nuts


Soap Nuts are not nuts at all really, they are actually berries of the sapindus tree.
When the berries ripen and drop to the ground they are collected and dried naturally
in the sun free of any pesticides or chemicals. This entirely eco-friendly, chemical free,
and hypo-allergenic laundry soap comes from the hard outer shell of the berry that
contains saponin (a natural detergent with anti-microbial properties) that is released
from the soap nut when it's agitated in water. The saponin acts as a water surfactant,
which enables water to penetrate fabric and mix with the dirt and oils so it can be
removed when the water is drained resulting in clean clothes without
the need for a rinse cycle.

Soap nuts are low sudsing so they are safe for HE washers, are gentle enough to
use on cloth diapers, and do not have added perfumes. However, if you prefer your
clothes to be scented you can always add a little of your favorite
essential oil to the wash bag.


To use them is as easy as can be, you simply pop 4 to 6 soap nuts into a wash bag
(which is usually provided with your order, but you can use any drawstring cloth bag),
and pop it into the washer. These same nuts will wash approximately 5 loads of laundry
(cold water allows for more washings). When the soap nuts have released all the saponin
(you will know because they will be shiny), go ahead and  toss them into your compost.

Not only are soap nuts much more eco-friendly (not requiring extra packaging, using
less energy, and require less water without the need for a rinse cycle) and 100% biodegradable, they are also MUCH cheaper than traditional laundry detergents. While traditional detergents average $11 for a 64 load bottle (17¢ a load) a $22 bag of soap
nuts yields on average approximately 300 loads of laundry equaling .076¢ a load
.

 The sapindus is native to Nepal, India, and some parts of Asia but will thrive in most
tropical regions inculuding some areas of the US. You can find out more about growing
your own sapindus here.  But be warned, if you are thinking of re-landscaping,
it takes about 10 years for the tree to produce the berries. 


Skyr Delight


Its official, I'm in love with Skyr! 
When I was grocery shopping the other day, I was looking to pick up some
Greek yogurt, and could not take my eyes off of siggi's beautiful packaging, so naturally
I had to add a couple of flavors (orange ginger, and pomegranate passion fruit) to my
cart to try out.  Today at lunch Lola and I had the orange ginger, and I have to admit it was the best yogurt I have ever had. So me being me...had to know everything there is to know about siggi's and skyr, and started researching once Lola was snoozing. As it turns out skyr (pronounced skeer) an Icelandic tradition is actually a cheese, super healthy...high
in protein, low in fat, and absolutely delicious!

siggi's rich and creamy 6oz container fed both me and Lola, and we were both
stuffed, (well I was...and she seemed to be) and the best part...it was only 100 calories!
OK, maybe that was the best part for my diet that I'm not as committed to as I should be.
The REAL best part about siggi's is that it's made from skim milk that comes from
grass fed cows who are not injected with hormones, and is packaged in "a cup
design that uses 40 to 50% less plastic than a  regular yogurt cup and is supported
by a recyclable cardboard sleeve."

Check out all of siggi's flavors and nutritional information here.


Cabin Fever

When I began this blog, or at least when the original concept for the blog came to me
(well over a year and a half ago now), I was extremely passionate about what it was that
I wanted to do, that I had something relevant to say, something that I believed would
interest, and perhaps even inspire readers (my mom, my sister, and best friend at first,
and then perhaps if I was right...in time...maybe, even a few strangers).

Inspiration first came when Jeff and I were living in a 90+ year old cabin in the middle
of the San Juan Mountains just outside Telluride, Colorado. The cabin was charming
and quirky, and was exactly what we were looking for. We knew it was going to be much
different from anything we were used to, a little harder, and liked that about it.


Jeff split wood while I would stack it (he would later re-stack it because he is a
perfectionist, which is one of the things that I love about him), we burned the wood for
heat, and we made everything from our bread to the cat's food ourselves (in part as a
conscious decision, and in part because the nearest mini market was an hour round trip
drive in the snow, and four hours round trip to the grocery store). Trash collection was
minimal, and so we reused and re-purposed absolutely everything. We didn't have TV, and
did not get cell reception. We did have internet, but it was spotty due to winter storms,
so mostly we didn't have internet. This was an incredible life experience, and a test
of what it means to live simply (hence the name of the blog).

The cabin was the first place that Jeff and I lived together, the place where we learned
so much about ourselves, and one another, the place where our daughter Lola was
conceived (no TV, no internet, barely any heat...we had to do something) and
a place that we both loved (I can say love now, because distance in time affords
you the benefit of nostalgia).

Since the first concept for this blog came to me, many many things have changed in my
life (having a baby, moving across the county, the decision to pursue a career as an art
teacher, and quite honestly a better understanding of blogs), and as a result so then will the
content of the blog, although my original concept of living simply, creating by hand, seeing
beauty in flaws, and striving to make the world a bit of a better place environmentally,
socially, and aesthetically both locally and globally remain.

I imagine that as I now start posting regularly (something that I have not been able to
do until now) I will start with the present, and occasionally tell you some of our wild
stories of life in the mountains (like the time that we had a sheet of  ice coating
the entire inside of the exterior wall in the kitchen, or when I stepped in snow in bare feet...in the living room, or how we hiked on snow shoes several miles into the woods during
a blizzard to cut down our own Christmas Tree...and then had to drag it back out...with the ropes we intended to use forgotten on the porch). The truth is, I intend to allow "Simply Living" to take on a life of it's own, and allow it to grow as it does. No formula, no strict schedule, just aspirations of fantastic blogging, and simply living of course.